
EKYC-FLUTTER
Compatibility & Lib Size
The Flutter SDK support
environment:
  sdk: ">=2.12.0 <4.0.0"
For Android build, SDK need following build environment
- compileSDK >= 35
- AGP >= 8.5.1
- Kotlin version >= 1.9.20
- ndkVersion 28+
- Java >= 11
For IOS, the plugin can install on iOS 12 but need iOS 13+ to make Ekyc work
Lib Size
On IOS, Lib will add around ~10MB to your application in thining mode (The real download size on App Store )
On Android, Lib will add around ~14MB to your application in App Bundle mode (The real download size on Google Play Store)
LiveNess License
To make the LiveNess feature work, EkycSDK check the app License based on the Android package name and IOS Bundle ID, so please contact our support team to support new package, bundle values.
If POC, please use com.ekyc.sdk.* format as your test project Bundle ID (iOS) and Package name (Android)
Current Version
Version: v2.5.2
How to Install EkycSDK Flutter Plugin
Android
Add plugin into pubspec.yaml
dependencies:
  flutter:
    sdk: flutter
  appman_ekyc_sdk:
    git:
    url: https://{{ provided github token }}@github.com/appman-genie/mac-identity-verification-flutter.git
    ref: {{version}} // ex. ref: v2.5.2
For OZLiveness, change version to v2.5.2-oz
dependencies:
  flutter:
    sdk: flutter
  appman_ekyc_sdk:
    git:
    url: https://{{ provided github token }}@github.com/appman-genie/mac-identity-verification-flutter.git
    ref: v2.5.2-oz
Add Maven configuration for Android
This plugin need EkycSDK from Native side, we need config Maven to fetch this one
Add below maven code block to android/build.gradle
Old Bucket
allprojects {
    repositories {
        google()
        mavenCentral()
        maven {
            url "s3://agm-android"
            credentials(AwsCredentials) {
                accessKey 'xxxxxxxx'
                secretKey 'yyyyyyyyy'
            }
        }
    }
}
New Bucket
allprojects {
    repositories {
        google()
        mavenCentral()
        maven { url "https://ozforensics.jfrog.io/artifactory/main" } // in case using OZLiveNess
        maven {
            url "s3://ekyc-sdk-prod"
            credentials(AwsCredentials) {
                accessKey 'xxxxxxxx'
                secretKey 'yyyyyyyyy'
            }
        }
    }
}
Change Android min SDK to 23
To complile EkycSDK, we need set minSdkVersion to 23 in android/app/build.gradle file
    defaultConfig {
        minSdkVersion 23
        targetSdkVersion flutter.targetSdkVersion
        versionCode flutterVersionCode.toInteger()
        versionName flutterVersionName
    }
Change to using FlutterFragmentActivity
This plugin using Android Fragment to embed NativeView to UI, needs to change extending class of MainActivity from FlutterActivity to FlutterFragmentActivity
File Path: android/app/..../MainActivity.kt
import io.flutter.embedding.android.FlutterFragmentActivity

class MainActivity: FlutterFragmentActivity() {
}
Progagate LiveNess return data
On LiveNess flow, the result data is turned back to EkycSDK through onActivityResult, we need to add the below block code in your MainActivity to propagate this data to Ekyc Fragment for further processing
import android.content.Intent
import io.flutter.embedding.android.FlutterFragmentActivity
class MainActivity: FlutterFragmentActivity() {
override fun onActivityResult(requestCode: Int, resultCode: Int, data: Intent?) {
super.onActivityResult(requestCode, resultCode, data)
// Find the Ekyc Fragment by Tag Name "EkycFragment" and propagate event to it
supportFragmentManager.findFragmentByTag("EkycFragment")?.let {
it.onActivityResult(requestCode, resultCode, data)
}
}
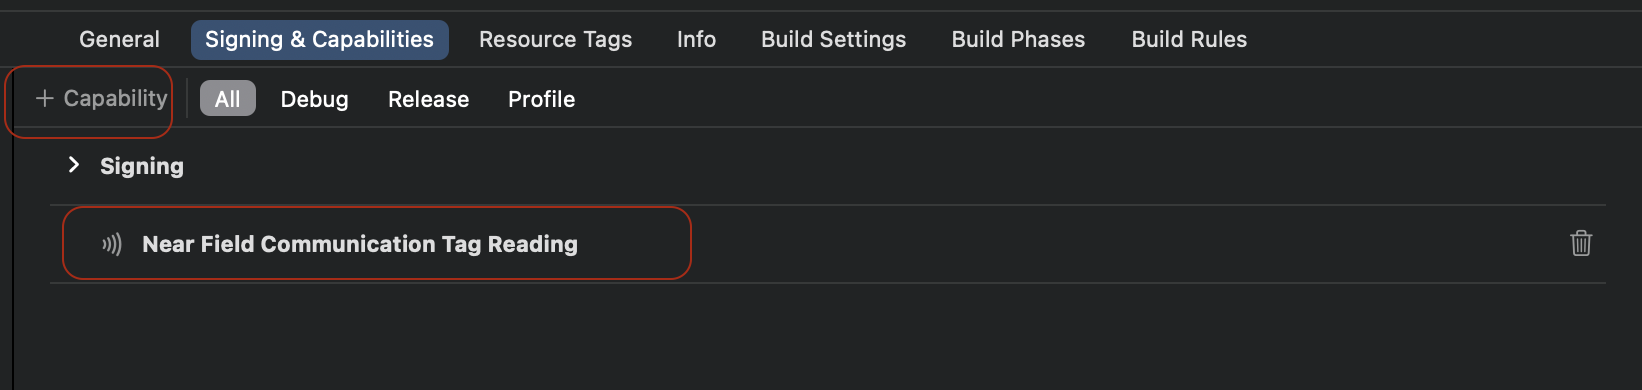
}Setup Permission NFC
Add permission for using NFC in file AndroidManifest.xml
<manifest>

  <uses-permission android:name="android.permission.NFC"/>

</manifest>
But if you don't want to use NFC, Please add this in the file AndroidManifest.xml
<manifest>

  <uses-permission android:name="android.permission.NFC" tools:node="remove"/>

</manifest><manifest>
<uses-permission android:name="android.permission.NFC" />
</manifest>IOS
Config Info.plist file for permissions & NFC
- Camera:

- Location (to get user location):

- Photo (to save QR code):

- NFC (optional):

Info.plist XML scripts
<dict>
<key>NFCReaderUsageDescription</key>
<string>This app uses NFC to scan passports</string>
<key>com.apple.developer.nfc.readersession.iso7816.select-identifiers</key>
<array>
<string>A0000002471001</string>
<string>A0000002472001</string>
<string>00000000000000</string>
</array>
<key>NSPhotoLibraryUsageDescription</key>
<string>This app requires this permission to save DipChip QRCode</string>
<key>NSPhotoLibraryAddUsageDescription</key>
<string>This app requires this permission to save DipChip QRCode</string>
<key>NSLocationWhenInUseUsageDescription</key>
<string>This app requires location for DipChip feature</string>
<key>NSCameraUsageDescription</key>
<string>Need Camera for OCR</string>
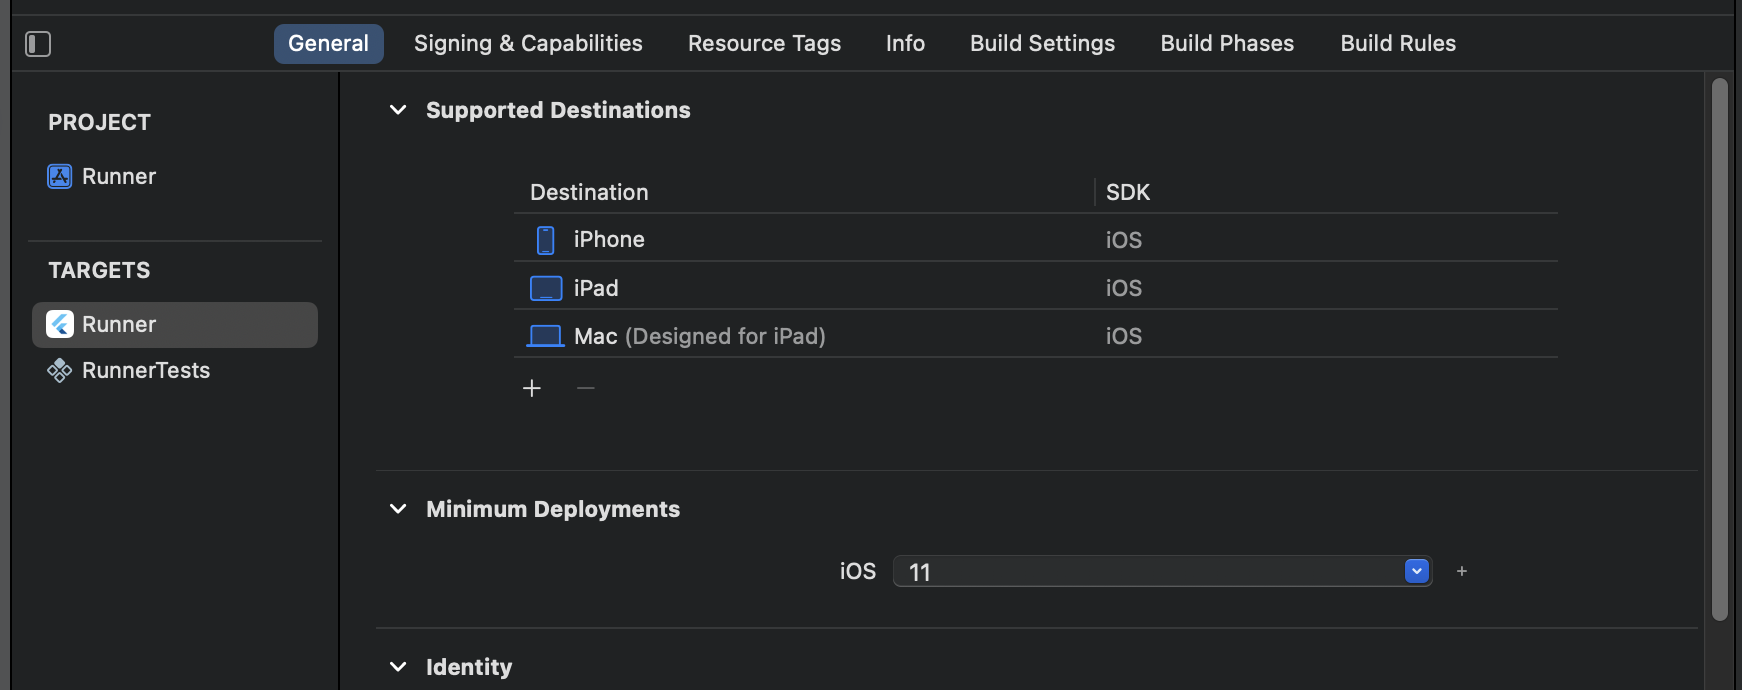
</dict>Set the minimum deployment target to 11(if need) or 13+
Example Project
Refer to this Example App to see how Ekyc Plugin working on Flutter
git clone https://{{provided github token}}@github.com/appman-genie/mac-identity-verification-flutter-example.gitShow cases for embed EkycWidgetView in Flutter
For example app, we implement 2 case when Embed Ekyc Flutter view
Parent -> Detail view
For this case, we can start every new Ekyc Case on new Page and back to Main page when finish.
Load EkycWidgetView inside 1 Page and Reload with new VerificationID
In this situation, we reload EkycWidgetView by execute function EkycWidgetView.reloadEkyc(String? withVerificationID)
Render EkycNative view on Dart side
First of all, we need setup
EkycConfigurationobject
For Security we have option to enable Google Play Integrity.
GCP_ID : is Google cloud project that you link to google play store.
DECRYPTION_KEY and VERIFICATION_KEY : is decryption key from setting on google play store.
final ekycConfig = EkycConfiguration(
  	...,
  	GCP_ID: "",
    GOOGLE_INTEGRITY_VERIFICATION_KEY: "",
    GOOGLE_INTEGRITY_DECRYPTION_KEY: ""
);final ekycConfig = EkycConfiguration(
clientName = "{{clientName}}",
ekycServiceURL = "https://mac-portal.appmanteam.com/api/{{version}}/kyc",
tenantServiceURL = "https://mac-portal.appmanteam.com/api/v1/tenant-config",
ekycSiteURL = "https://{{clientName}}.mac.appmanteam.com/apps/identity-verification",
verificationId = "{{verificationID}}",
language = "th" // or en
enableDipChipFlow: true, // set false to avoid Location request popup
emulatorMode = false,
enableManualCaptureMode = false // Default is false, SDK will using ML and auto capture
// when detected IDCard frame (Both Normal/ Hologram mode)
);enableManualCaptureMode
if you are using auto capture for ocr, and want to disable auto capture you can set enableManualCaptureMode to true.
final ekycConfig = EkycConfiguration(
					  ...,
          	enableManualCaptureMode = true // Default is false.

    );
Refer to Emulator Mode & SDK Security sessions
Create EkycListener to observe all Ekyc callbacks
var ekycListener = EkycListener(
    onEkycStarted: () {
      debugLog("onEkycStarted");
    },
    onEkycStoped: () {
      debugLog("onEkycStarted");
    },
    onEkycError: (ekycError, description) =>
        {debugLog("onEkycError ${ekycError.toString()} $description ")},
    onEkycStatus: (ekycStatus) =>
        {debugLog("onEkycStatus ${ekycStatus.toString()} ")});
The onEkycError & onEkycStatus will return errors & status from the enums EkycError, EkycStatus
enum EkycStatus { open, completed, expired, verified, retry }enum EkycError {
ekycAlreadyStarted,
missingConfiguration,
sslPiningError,
securityError,
osNotSupport,
cameraBindingError,
cameraCaptureError,
unKnown,
virtualCamera,
useOtherCamera
}Refer to EKYC Listeners for more detail
Finally, we embed EkycWidgetView to Flutter with ekycConfig & ekycListener
  @override
  Widget build(BuildContext context) {
    return Scaffold(
      appBar: AppBar(
        title: Text(widget.title),
      ),
      body: EkycWidgetView(
          ekycConfiguration: ekycConfig, ekycListener: ekycListener),
    );
  }
Start LiveNess Match Checker process (Only Support FaceTec version)
EkycSDK also supports doing the LiveNess process only to recheck the Liveness with the current EKYC result
LiveNess required parameters
To start the liveness process, we need setup EkycConfiguration object
final ekycConfig = EkycConfiguration(
    clientName = "{{clientName}}",
            ekycServiceURL = "https://mac-portal.appmanteam.com/api/{{version}}/kyc",
            tenantServiceURL = "https://mac-portal.appmanteam.com/api/v1/tenant-config",
            ekycSiteURL = "https://{{clientName}}.mac.appmanteam.com/apps/identity-verification",
            verificationId = "{{verificationID}}",
            language = "en" // or th
            enableDipChipFlow: true, // set false to avoid Location request popup
            emulatorMode = false,
            GCP_ID: "",
            GOOGLE_INTEGRITY_VERIFICATION_KEY: "",
            GOOGLE_INTEGRITY_DECRYPTION_KEY: "");
    );
Start Liveness Match Checker
For next step, call the start function in LiveNessMatchChecker
   	 ElevatedButton(
                  onPressed: () {
                    rebuildEkycConfig();
                    LiveNessMatchChecker(ekycConfig, liveNessListener).start();
                  },
Liveness Listener
All Liveness events will be notified through theLiveNessListener.
        var liveNessListener = LiveNessListener(onLiveNessStarted: () {
            debugLog("onLiveNessStarted");
          }, onLiveNessError: (livenessError, description) {
            debugLog("onLiveNessError ${livenessError.toString()} $description");
          }, onLiveNessStatus: (livenessStatus) {
            debugLog("onLiveNessStatus ${livenessStatus.toString()} ");
          });
Liveness Started event
The onLiveNessStarted event will be notified after LiveNessMatchChecker.start() is called without any setup error
Liveness Status event
Notify the Liveness Status includes: completed, userCancel through onLiveNessStatus(liveNessStatus: LiveNessStatus).
Liveness Error event
We support the following error cases in Liveness SDK through enum class LiveNessError)
enum LiveNessError {
  missingConfiguration,
  sslPiningError,
  securityError,
  tenantConfigError,
  getCredentialsError,
  livenessSetupError,
  cannotGetLiveNessToken,
  unknownError,
  ekycMissing,
  osNotSupport
}
Please refer to Android LiveNess Match for more detail related to LiveNess callback.
Skip Android Security Item
To skip any IOS Security item, add IOSSecurityItem to ignoreIosSecurityList before embed EkycWidgetView pr do LiveNess check, SDK will ignore this security item checking when starting.
For Android allows to skip only Debug mode, Set true in flag ignoreAndroidSecurityDebug
void main() {
  if (!kReleaseMode) {
    ekycConfig.ignoreAndroidSecurityDebug = true;
    ekycConfig.ignoreIosSecurityList    = [IOSSecurityItem.debug];
  }

  runApp(
    const MaterialApp(
      home: MyApp(),
    ),
  );
}
Refer to Android Security and IOS Security for more detail
Turn Off DipChip Flow
This configuration only affects on EKYC flow.
On IOS, it takes a very long time to fetch the location to submit on DipChip flow, so EkycSDK requests the location when starting the Ekyc process (The Location request popup will be shown also).
We can turn off this feature by setting the EkycConfiguration.enableDipChipFlow = false. This also makes the Location request popup not show.
FAQs (Integration issues)
Conflict Pod Version when using the new Plugin version

A:To fix this issue, please remove ios/Podfile.lock in your project and run
pod install --repo-update
Upgrade new plugin version but nothing changes or can not start sdk
The Gradle build system sometimes can not detect the correct plugin version because of caching.
A:We need to delete the old EkycPlugin cache folder to make the new version effective by removing the following folder: ~/.pub-cache/git/mac-identity-verification-flutter….XXXXXX
Step to clean cache and test Example app
rm -rf ~/.pub-cache/git   <---- Clear SDK on git cache folder
Remove pubspec.lock file
flutter clean
flutter pub get
flutter run
File name is too long on Window
On Window, the file name is too long error may happen when running flutter pub get, this make flutter can not build Ekyc Plugin, we can resolve this issue by the following way
A:
- Remove the broken Ekyc plugin folder at: %LOCALAPPDATA%\Pub\Cache\git\mac-identity-verification-flutter...
- Execute this command to allow git to work with long file name
git config --system core.longpaths true
- Restart IDE and run flutter pub get again.
Can not fetch Plugin using Github Token on Window
On Window, some case, Flutter can not fetch EKYC Plugin using Github Token (fatal: ambigous argument error from command line). This is the Git issue when processing special characters in github URL
To fix this issue, do the following steps
- Config to remove token from git URL Run this command from terminal
git config --global url."https://[email protected]/appman-genie/".insteadOf "https://github.com/appman-genie/"(Replace xxx by real token value)
- Remove token from pubspec.yaml
git:
url: [https://github.com/appman-genie/mac-identity-verification-flutter.git](https://github.com/appman-genie/mac-identity-verification-flutter.git)
ref: v2.2.0-oz```- Clean cache and redownload dependencies
flutter clean
flutter pub get
iOS Application crashed with error about no such file framework
no such file framework
A:Check your Podfile, it should use
**use_frameworks!**like example belowinstead of use_frameworks! :linkage => :static which make EKYC library not load completely.
> target 'Runner' do
>
>   use_frameworks!
>   use_modular_headers!

>   flutter_install_all_ios_pods File.dirname(File.realpath(**FILE**))
> end
Can not find symbol AppmanEkycSdkPlugin
Sometime the Java cache build can make this issue occurred
mac-identity-verification-flutter-example/android/app/src/main/java/io/flutter/plugins/GeneratedPluginRegistrant.java:19: error: cannot find symbol
      flutterEngine.getPlugins().add(new com.ekyc.sdk.flutter.appman_ekyc_sdk.AppmanEkycSdkPlugin());
                                                                             ^
  symbol:   class AppmanEkycSdkPlugin
  location: package com.ekyc.sdk.flutter.appman_ekyc_sdk
To fix this one, run following commands and build Pluggin again
rm -rf android/.gradle android/build
fvm flutter clean && fvm flutter pub get